

A Practical Guide to Hot Tub Installation Requirements
Hot Tub Installation Starts With Smart Planning
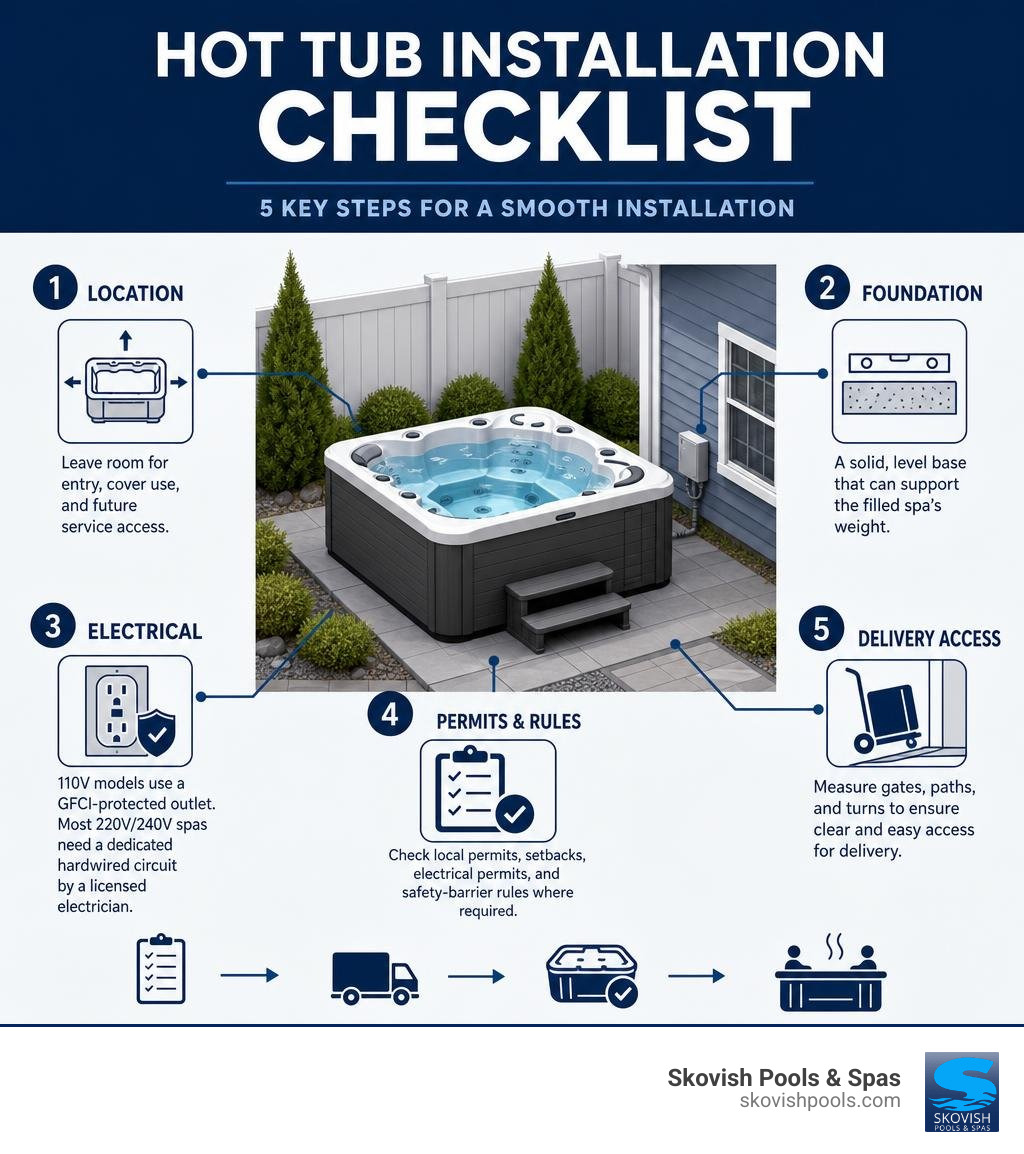
Hot tub installation requires four basics: a level base that can carry the filled spa’s weight, safe electrical service, a clear delivery path, and local-code approval where required. Most portable hot tubs are self-contained, so they do not need permanent plumbing; they are filled with a garden hose and drained when needed.
Before your spa arrives, confirm:
- Location: Leave room for entry, cover use, and future service access.
- Foundation: A filled hot tub can weigh 3,000 to 6,000 pounds, so its base must be solid, level, and properly rated for the load.
- Electricity: Plug-and-Play 110V models use a GFCI-protected outlet, while most 220V/240V spas need a dedicated hardwired circuit installed by a licensed electrician.
- Delivery and rules: Measure gates, paths, and turns, then check local permits, setbacks, electrical permits, and safety-barrier rules before work begins.
A well-planned location makes a spa easier to use through a Northeastern Pennsylvania winter, protects your investment, and helps avoid expensive changes after delivery. It also creates the foundation for year-round relaxation and the potential wellness benefits of regular soaking, including the benefits covered in Hot Tub Installation: 4 Health Benefits.
I am Marty Skovish, Senior Manager at Skovish Pools & Spas, with more than four decades of experience in pool and spa work across Northeastern Pennsylvania. Our team uses that hands-on hot tub installation experience to help homeowners plan a safe, practical backyard setup before delivery day.
Site Preparation: Choosing the Ideal Location and Foundation
Finding the perfect spot for your hot tub installation is about balancing daily convenience with structural safety. In our decades serving homeowners in Luzerne County and across Pennsylvania, we have seen that proximity to your home is one of the single biggest drivers of how often you will use your spa. Walking ten feet across a warm patio in sub-zero winter temperatures is an inviting prospect; trekking fifty yards through snow drifts to a distant corner of the yard quickly turns a relaxing soak into a chore.
Beyond simple convenience, proper site selection requires strict attention to weight, clearance, and environmental factors:
- Structural Support: An average 6-person hot tub filled with water and bathers exerts a massive footprint load—often upwards of 115 to 120 lbs per square foot. Your foundation must be engineered to hold at least 125 lbs per square foot without sinking or shifting.
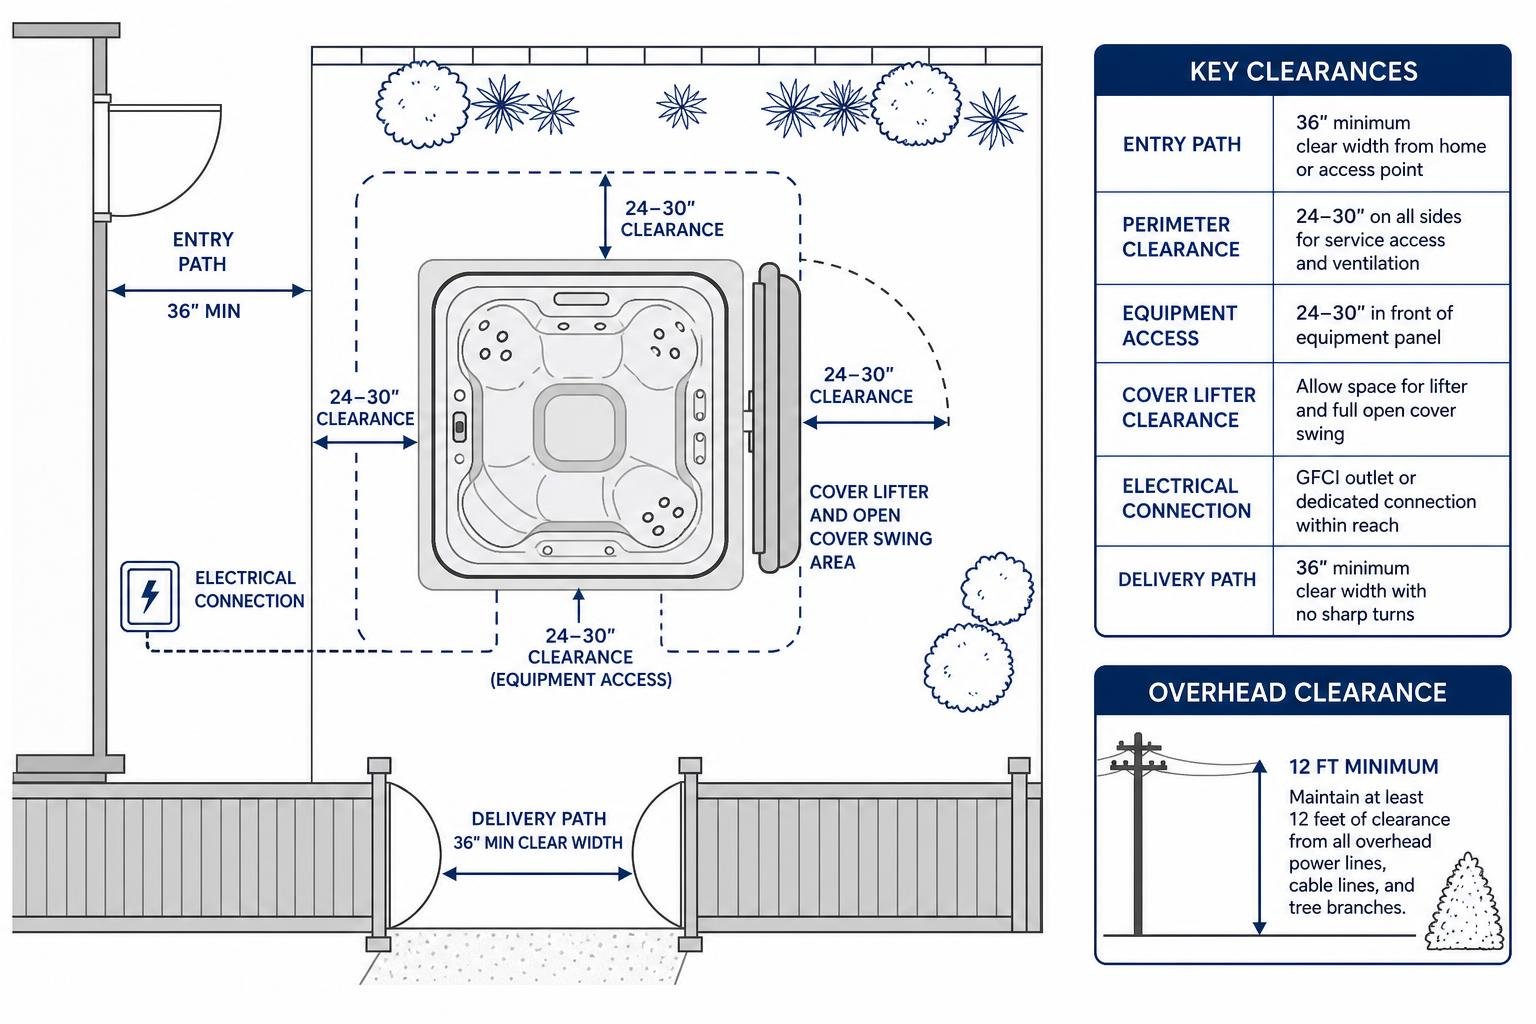
- Service Access Clearance: Leave at least 24 to 30 inches of unobstructed clearance around the perimeter of the hot tub, particularly in front of the primary equipment hatch panel. Electricians and service technicians must be able to remove side panels without tearing down nearby lattices or decking.
- Microclimate and View Alignment: Take time to sit in a lawn chair where you plan to place the tub to check line-of-sight views. Consider where wind gusts originate, where roof runoff or falling ice might drop during winter, and how your cover lifter will fold down. Position the open cover so it serves as a natural windbreak and privacy barrier from nearby neighbors.
- Overhead Clearances: Never place a hot tub within 12 feet of overhead power lines, cable lines, or telephone wires. Likewise, avoid positioning your spa directly under heavy-tree canopies where sap, leaves, and organic debris will constantly foul your filtration system.
Hot Tub Installation Foundation Options
A hot tub requires an unyielding, completely level foundation. Never place your spa directly on bare soil, grass, or uncompacted ground. Over time, moisture and uneven weight will cause the tub to settle unevenly, warping the acrylic shell, binding internal plumbing, and voiding your manufacturer warranty.
Here are the primary foundation options we recommend, detailed further in our Hot Tub Foundation and Placement Guide:
- Poured Concrete Slab: Considered the gold standard for long-term stability. A concrete slab should be a minimum of 4 inches thick (6 inches for larger 8-person units) reinforced with rebar or steel wire mesh. The pad should extend 12 to 18 inches beyond the footprint of the hot tub on all sides. Poured concrete requires a full 28-day curing period to reach its maximum design strength before supporting thousands of pounds of water.
- Compacted Crushed Gravel Base: An excellent, cost-effective DIY alternative to concrete. Excavate 6 to 8 inches of soil, install a heavy-duty geotextile weed barrier, and backfill with graded #57 crushed angular gravel stone. Tamp and compact the gravel in layers. Angular gravel interlocks tightly, providing superior drainage while maintaining structural load ratings. Avoid round pea gravel or river rock, which roll under load.
- Synthetic Modular Spa Pads: High-density polymer pads (such as interlocking pad systems) offer a fast, clean foundation. However, they must still be installed over a completely level, 4- to 6-inch bed of compacted gravel or crushed stone sand—not directly over soft grass.
- Interlocking Concrete Pavers: Pavers laid over a properly excavated and compacted gravel-sand bed create an attractive, durable surface. Ensure every paver is perfectly level within 1/8 inch across the total span to prevent localized pressure points on the spa cabinet.
Installing on Decks and Above-Ground Structures
Putting a spa on an elevated wooden or composite deck is a popular choice, but it demands serious structural verification.
A standard residential deck is designed under local building codes to support a live load of 40 to 50 lbs per square foot. A filled hot tub places roughly 120 lbs per square foot on that exact same footprint—nearly three times the design capacity of standard deck framing!
Before placing any spa on an existing or new deck, review our complete recommendations on Tips to Put a Hot Tub on a Pool Deck and complete these mandatory structural upgrades:
- Professional Inspection: Have a licensed structural engineer or qualified contractor evaluate your deck joists, support beams, posts, and ledgers.
- Reinforcement: Expect to add sistered joists (doubling up 2×10 or 2×12 joists), add heavy post-to-beam connectors, and pour thick concrete pier footings directly beneath the spa footprint to transfer weight straight to the ground.
- Flush Mount Options: If building a new deck around a hot tub, many homeowners prefer sinking the tub flush or semi-flush into the structure. In these custom builds, the hot tub rests on a poured concrete pad at ground level, with the deck built up around it. Be sure to leave access hatches in the deck boards for future technical maintenance.
Electrical Requirements and Safety Standards
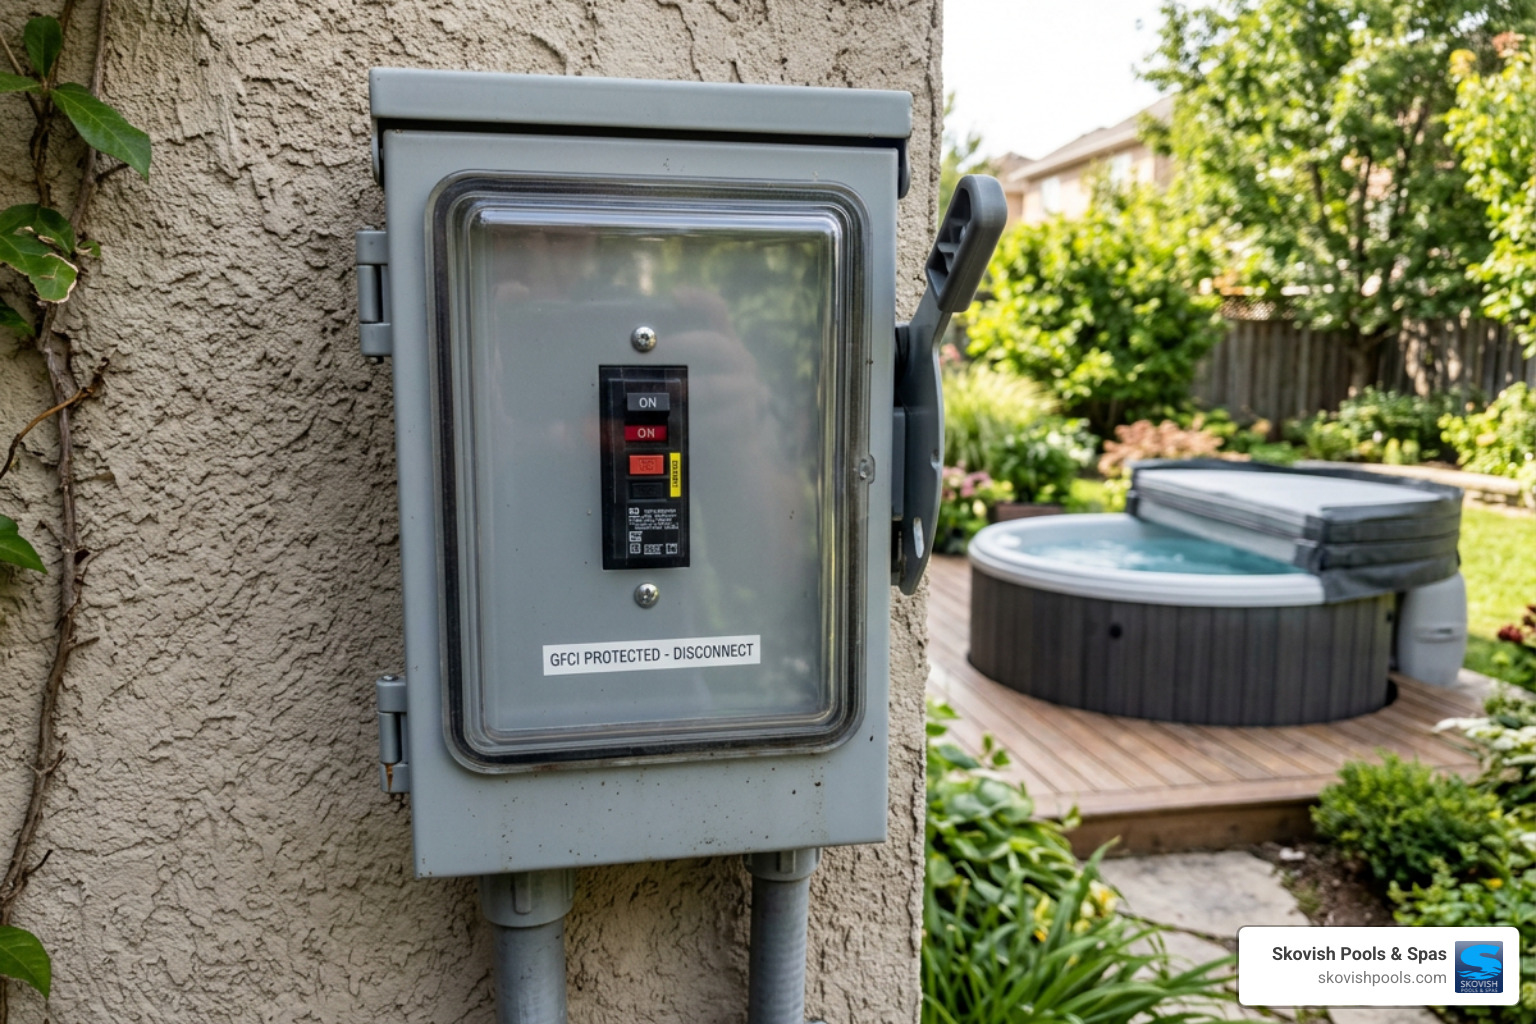
Water and high-voltage electricity demand uncompromising safety standards. Electrical work for any hot tub installation must strictly follow National Electrical Code (NEC) Article 680 regulations as well as local Pennsylvania municipal codes. Because hot tubs draw substantial power and operate in wet environments, electrical hookups must always be performed by a licensed electrician.
Key mandatory electrical safety standards include:
- Dedicated Circuit: Your hot tub must operate on its own dedicated circuit originating from your home’s main service breaker panel. It cannot share a line with patio lights, outlets, or garage appliances.
- Proper Copper Wiring: All wiring run to a hot tub must be copper conductors enclosed in liquid-tight, weather-resistant conduit. Aluminum wiring is strictly prohibited by code for spa connections due to expansion risks.
- Equipotential Bonding: NEC rules mandate that all metallic structural elements within 5 feet of the spa water (including railings, metal gutters, or structural posts) must be bonded together using a solid #8 AWG copper bonding wire attached to the spa’s grounding lug. This prevents stray voltage differentials that could cause electrical shocks.
110V Plug-and-Play vs. 220V/240V Systems
Hot tubs generally fall into two distinct electrical categories: 110V/120V “Plug-and-Play” models and 220V/240V hardwired systems. Choosing the right system depends on your climate, household electrical capacity, and how you plan to use your spa.
If you are planning an indoor or basement spa setup, review our detailed guide on Indoor Hot Tub Installation Electrical Guidelines to manage proper sub-panel hookups and moisture protection.
| Feature / Requirement | 110V / 120V Plug-and-Play Models | 220V / 240V Hardwired Systems |
|---|---|---|
| Power Hookup | Standard 15A/20A dedicated GFCI wall outlet | Hardwired to dedicated 40A, 50A, or 60A sub-panel |
| Electrician Required? | No (if dedicated GFCI outlet exists within 10 ft) | Yes, mandatory licensed electrician installation |
| Heater Wattage | ~1.0 kW to 1.5 kW | ~4.0 kW to 6.0 kW |
| Water Heating Rate | 1°F to 2°F per hour (24+ hours for initial heat) | 2°F to 5°F per hour (4 to 8 hours for initial heat) |
| Simultaneous Pump/Heat | No (heater turns off when high-speed jet pump runs) | Yes (heats water while high-speed jets operate) |
| Cold Climate Performance | Moderate (water temp slowly drops during winter use) | Superior (maintains target temp in freezing weather) |
| Installation Cost | Low upfront cost | Higher initial wiring cost ($800–$1,600) |
For homeowners in colder regions like Pennsylvania, a 220V/240V system is almost always the better long-term choice. It keeps water scorching hot even during mid-winter night soaks while running multi-jet therapy pumps at full blast.
Safety Features: GFCI Breakers, Disconnect Boxes, and Wiring
The National Electrical Code mandates a specific safety buffer between your hot tub water and its main power disconnect point:
- Line-of-Sight Disconnect Box: A manual GFCI emergency disconnect switch (or sub-panel) must be installed at least 5 feet away from the inside wall of the hot tub, but no further than 50 feet away. It must be clearly visible and accessible to anyone inside or near the spa so power can be cut instantly during an emergency.
- Never Use Extension Cords: Plug-and-play 110V models come with a factory-installed power cord featuring a built-in GFCI module. This cord must plug directly into a dedicated wall outlet. Never use an extension cord; doing so creates dangerous voltage drops, overheats wire insulation, creates severe shock hazards, and voids electrical certifications.
- Ground Fault Protection: Every single hot tub—regardless of voltage—must be protected by an inline Ground Fault Circuit Interrupter (GFCI). GFCI breakers detect minuscule leaks of electrical current (as small as 4 to 6 milliamperes) and trip the breaker in a fraction of a second to prevent electrocution.
Permits, Regulations, and Delivery Logistics
Before bringing a spa home, verify all local regulatory requirements. Municipalities require different combinations of building permits, electrical permits, and safety compliance certificates.
- Permits: Most local building departments require an electrical permit for running new 220V lines or sub-panels. In some areas, adding concrete slabs or elevated decks also requires a standard residential building permit.
- Zoning Setbacks: Local municipal zoning codes dictate how close a hot tub can be placed to property lines, easements, septic tanks, or secondary structures. Always verify setback rules with your local township office before pouring concrete or scheduling delivery.
- Safety Barriers & Fencing: Many jurisdictions enforce residential swimming pool and spa safety laws. These codes may require a 4-foot safety fence with self-closing, self-latching gates surrounding the yard. In many areas, an approved, locking hard-shell safety cover that meets ASTM F1346 standards satisfies the barrier requirement without extra fencing.
- HOA Rules: If you belong to a Homeowners Association, review covenants regarding outdoor spa placement, privacy screen designs, and electrical conduit routing.
Before delivery day, review the official Outdoor Hot Tub Pre-Delivery Guide to double-check structural clearances and transit prep.
Preparing Your Property for Hot Tub Installation
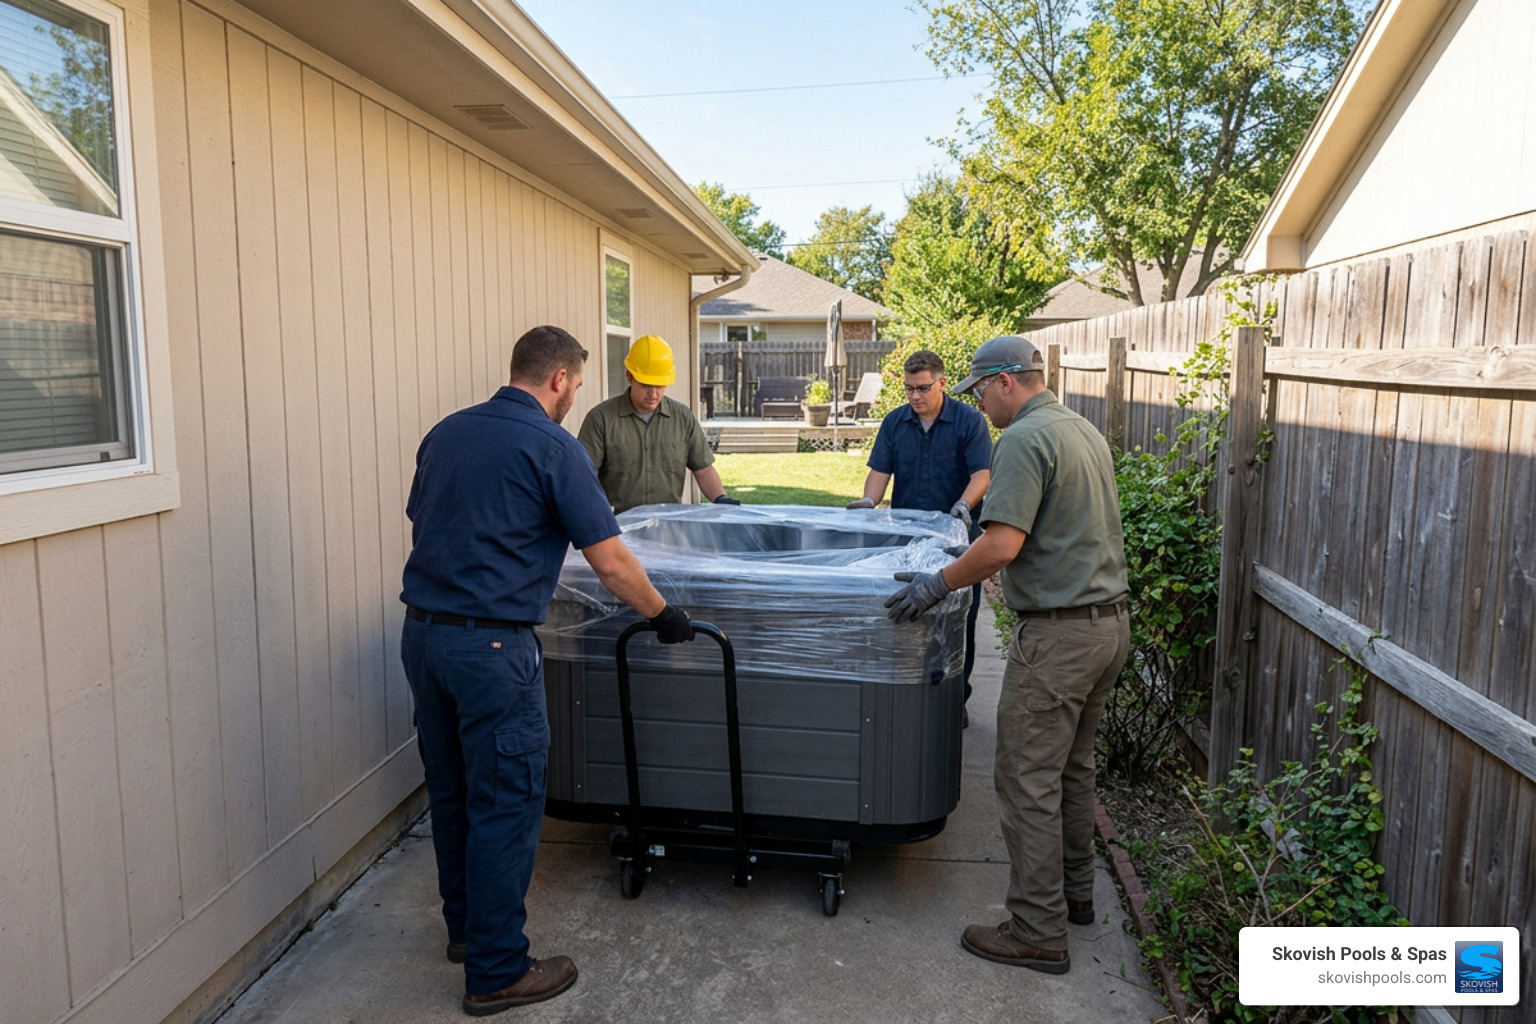
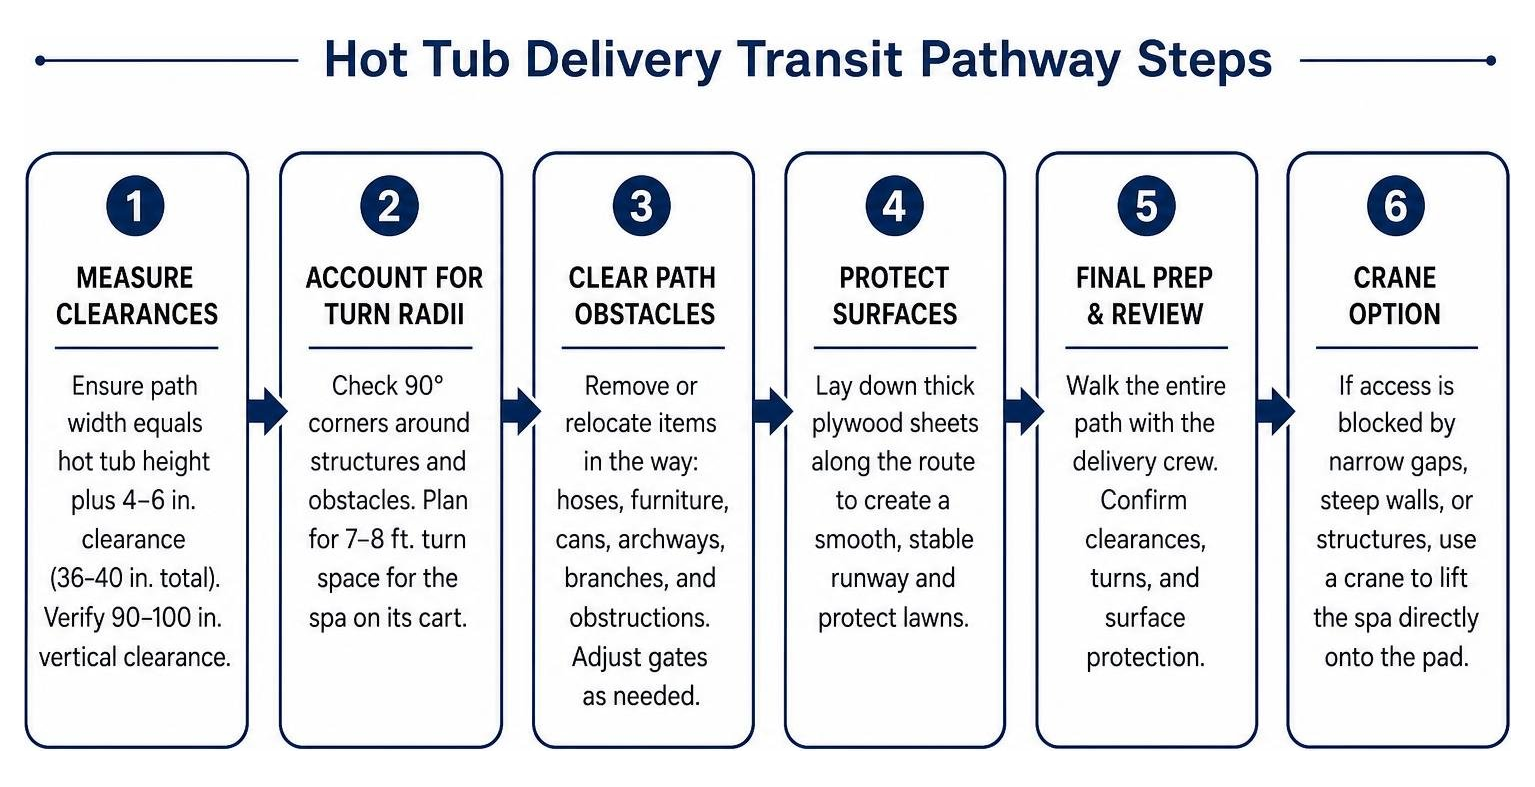
Getting a 500- to 1,000-pound dry hot tub from the delivery truck in your driveway to its permanent location in your backyard is a coordinated operation. Delivery crews transport spas on specialized edge-rolling carts (spa dollies) with the tub standing vertically on its side.
Follow this checklist to prepare your delivery pathway:
- Measure Physical Clearances: Measure the entire delivery path from street to pad. You need a clear passage width equal to the height of the hot tub plus at least 4 to 6 inches of cart clearance (typically 36 to 40 inches total width). Ensure you have at least 90 to 100 inches of vertical clearance under gutters, roof eaves, and tree branches.
- Account for Turn Radiuses: Check 90-degree corners around house foundations, chimney breasts, or air conditioner units. A 7-foot or 8-foot spa standing on a cart cannot navigate tight, right-angle turns around narrow wall gaps.
- Clear Path Obstacles: Remove garden hoses, lawn furniture, trash cans, archways, and overhanging tree branches. Gates may need to be unhinged or fence sections temporarily removed.
- Protect Lawn Surfaces: Soft ground or muddy turf can sink heavy delivery carts. Lay down sheets of thick plywood along the path to create a smooth runway for the delivery crew.
- Crane Delivery Services: If side yard access is blocked by narrow gaps, steep retaining walls, or close neighboring structures, a professional crane service can be arranged. A crane lifts the spa safely over your home or garage directly onto the prepared pad—a routine process that takes less than an hour.
Hot Tub Installation Costs and Budget Planning
Understanding the complete financial picture helps you budget accurately beyond the initial price tag of the spa shell itself. On average, secondary hot tub installation costs beyond the tub purchase run between $1,500 and $5,000 depending on site complexity, electrical distance, and pad choices.
Here is a typical breakdown of preparation expenses:
- Electrical Installation: $800 to $1,600. Includes dedicated 50A GFCI sub-panel, copper wiring, conduit, exterior disconnect box, and labor from a certified electrician. (Extremely long wire runs from main panels can increase costs).
- Foundation Preparation:
- Compacted Gravel Base: $150 to $400 (DIY) or $500–$900 (Professional).
- Poured Reinforced Concrete Slab: $400 to $1,200 depending on dimensions and excavation needs.
- Prefabricated Synthetic Pad: $400 to $700.
- Deck Reinforcement: $1,000 to $3,500+ depending on structural engineering requirements.
- Permit Fees: $50 to $250 depending on local township electrical and building permit schedules.
- Crane Service (if required): $500 to $1,000 for standard yard hoisting.
- Monthly Utility Costs: Operating a modern, well-insulated 220V spa costs roughly $20 to $60 per month in electrical power ($30 to $50 average in mid-Atlantic climates). High-density foam insulation and custom-fitted locking covers cut thermal losses by up to 50%.
To explore localized regional pricing, consult our resource on Hot Tub Costs and Ownership Expenses in NEPA. If you want to spread out project costs, learn about flexible payment options through our Hot Tub Spa Financing Options guide.
First-Time Startup: Filling, Purging, and Maintenance
Once your hot tub is placed on its level pad and hardwired by your electrician, you are ready for initial startup. Never turn on electrical power to an empty hot tub—running heaters or jet pumps without water will ruin mechanical seals and burn out heating elements within seconds.
For step-by-step startup insights, review this comprehensive Step-by-Step Hot Tub Installation and Startup Guide alongside our standard professional protocol:
Step 1: Pre-Fill Inspection and Hose Placement
Open the main equipment cabinet hatch to confirm all union fittings on the pumps and heater pack are hand-tightened (these can loosen during freight transit). Ensure all internal gate valves are fully open. Insert your garden hose directly into the primary filter housing standpipe. Filling through the filter housing forces water down through the internal plumbing lines, pushing air out of the system and preventing annoying pump air locks.
Step 2: The Essential Factory Purge
Every new hot tub is wet-tested at the factory before shipping. Water left inside internal plumbing lines during transit and warehouse storage can harbor bio-films or industrial residues.
- Fill the tub with fresh water.
- Turn on power at the main breaker and GFCI disconnect panel.
- Add a dedicated pipe purge cleaner to the water and run jet pumps on high speed for 20 to 30 minutes.
- Cut power, drain the vessel completely using a garden hose or submersible pump, wipe down the acrylic shell, and refill fresh water through the filter standpipe once more.
Step 3: Heating and Initial Water Chemistry
Turn main power back on. Set your desired target temperature (100°F to 104°F). Keep the insulated cover closed tight while heating. A 220V model will heat water at a rapid 2°F to 5°F per hour.
Once water temperature climbs above 85°F, test and balance your water chemistry using test strips or a liquid test kit:
- Total Alkalinity: Adjust first to establish a buffer. Target range is 80 to 120 ppm.
- pH Level: Balance next. Target range is 7.4 to 7.6.
- Sanitizer: Add shock and establish your primary sanitizer level (Chlorine: 3.0 to 5.0 ppm; Bromine: 3.0 to 5.0 ppm).
- Allow water to circulate for 12 to 24 hours before your initial soak to ensure full sanitizer distribution and thermal stability.
Common Installation Mistakes to Avoid
- Shimming the Cabinet: Never place wooden shims under cabinet corners to level a tilted tub. Shimming creates point loads that crack shell acrylic. Always level the base beneath the tub instead.
- Ignoring Air Locks: If pumps hum but push no water on initial startup, an air lock is trapped in the wet end. Bleed trapped air by cracking a union fitting on the pump face slightly until water dribbles out, then retighten.
Frequently Asked Questions About Hot Tub Installation
Do I need a building permit to install a hot tub?
In most communities, portable self-contained hot tubs placed on ground-level pads do not require a major building permit. However, nearly all municipalities require an electrical permit for installing 220V sub-panels or exterior power circuits. Always verify zoning setbacks and safety barrier codes with your local township building official prior to installation.
How long does a hot tub take to heat up for the first time?
Heating times depend on voltage and starting tap water temperature. A hardwired 220V/240V system equipped with a 4kW to 6kW heater raises water temperature by 2°F to 5°F per hour, reaching 102°F in about 4 to 8 hours. A 110V plug-and-play model (1.5kW heater) heats much more slowly—at 1°F to 2°F per hour—taking 24 to 36 hours for initial heating.
Can I plug a hot tub into a standard extension cord?
No, never plug a hot tub into an extension cord. Extension cords cause severe voltage drops, over-heat copper wiring, create fire hazards, and violate National Electrical Code safety standards. Plug-and-play 110V spas must be plugged directly into a dedicated, wall-mounted GFCI outlet located within 10 feet of the spa.
Partner With Pennsylvania’s Premier Spa Installation Experts
A successful hot tub installation turns your backyard into a personal wellness sanctuary that provides comfort year after year. By carefully selecting a level foundation, securing NEC-compliant electrical service, and prepping your yard for smooth delivery logistics, you protect both your home and your investment.
When undertaking a major home improvement project, working with an experienced dealer makes all the difference. Read our guide on Why It’s Vital to Choose the Right Hot Tub Dealer to see how full-service support removes stress from start to finish.
For more than 50 years, our family-owned team at Skovish Pools & Spas has helped homeowners across Luzerne County, Shickshinny, Luzerne, and the surrounding Northeastern Pennsylvania region design, install, and maintain custom spas and pools. We handle every step—from initial site assessment and foundation planning to electrical coordination, delivery, and ongoing water chemistry care.
Ready to plan your ideal backyard retreat? Explore our complete Hot Tub Installation Site Preparation Guide or contact our expert team today to schedule your free consultation!


